.png)


Add a lining and an adjustable strap to the Granny Fanny
- Nichole Jensen
- May 4, 2023
- 9 min read
Updated: May 26, 2023

Have you seen the free pattern for the Granny Fanny on Yarnspirations?! It's adorable and very on trend right now. It's just four granny squares stitched together to make a fanny pack/bum bag you can wear as a crossbody.
This small bag is so on trend that even one of my teenagers wanted one and considering that I find teenagers some of the hardest people to make gifts for, that's saying something.

There were just a few things I wanted to add to the pattern to make it more useful for me – an adjustable strap, and a lining. I wanted to make sure that the strap would fit me well and fit anyone else I made one for.
I also didn't want to worry about anything important falling out through the holes. I personally never go anywhere without a tube of Carmex. Is it just me or do you have small things you MUST have on you at all times? Well, if you do you might want to line the bag too.
I used a sewing machine for the lining and strap because I wanted it to be secure and my hand sewing leaves much to be desired.
Of course, I made one for myself first just to see if I liked the way it went together and if I liked using it. It's a very easy (and did I mention FREE?) pattern to put together, and I LOVE using it. Since it passed both of those tests, I was ready to start making them to give away.
If you are a visual learner or if any of the crochet pattern doesn't make sense, there is a video tutorial here that walks you through it at Repeat Crafter Me.
Here is a video tutorial for adding the lining and strap:
Supplies for the Granny Fanny:
This post may contain affiliate links which means at no extra cost to you I may receive a commission if you decide to make a purchase through my links.

For the crocheted squares on the white bag I used – I Love This Yarn in Antique White, Pink, Ocean, Amethyst, Soft Blue, and Buttercup. The light orange is Michael's Craft Smart in Peach.
For the crocheted squares on the black bag I used - I Love This Yarn in Black, and Red Heart Super Saver in Retro Stripes. I separated the colors from the Retro Stripes yarn and used each ball individually. I do not enjoy the randomness of striping yarns. I want my colors to change when I want them to change darn it.
H 5 mm crochet hook - these are far and away my favorite hooks and if you haven't already, you should give them a try
2 - 1-inch D rings
12-inch zipper – these are the same ones used by Sarah from Repeat Crafter Me in the tutorial
¼ yard of cotton fabric
54-60 inches of 1-inch nylon or cotton webbing for the strap depending on how big you want to make it
1 - 1-inch slide adjuster/tri-glide/adjustable slide buckle - This can have an adjustable center bar or a solid center bar, either will work great
sewing pins – this is my adorable hedgehog pin cushion and the pins that come with it.
matching thread
sewing machine
optional:
lighter to burn the edges of the webbing
Let's get started:
First, follow the pattern to make the body of the bag and complete it as written until you get to the top edging.

The pattern says to join your B yarn with a slip stitch to the top edge of the bag at the right corner. I found it much easier to join the yarn at a seam on the back of the bag. For the first two rounds of the edging this won't really matter, but in the third round it will make your life much easier.
Adding the D rings:

Complete the first two rounds as written in the pattern (except the spot where you join the yarn). On the third round, follow the pattern until you get to one of the ends. These rise up to a peak so I will refer to the very top of this area as the "peak".

Beginning two stitches before the peak, lay the D ring against the inside of the bag so the straight portion is up.

Single crochet over the D ring for 5 stitches - the two stitches before the peak, the peak itself, and two stitches after.
Continue single crocheting until you reach other side of the bag. Beginning two stitches before the second peak, repeat the same process to single crochet over the second
D ring.
These D rings will be where you clip the adjustable strap later.
Sewing the lining:
It’s time to add the lining.
Fold your cotton fabric in half so your completed crochet bag will fit on top of both layers at the same time.

Lay the bag on top of your fabric and use a fabric marker to trace around the bag without touching the marker to the bag. You don’t want any marker transfer here. You could add about ¼ inch to this, but having a lining that is just a bit smaller allows it to fit inside without bunching up, so I recommend just tracing the outside of the bag.
Pin the front and back of the fabric together so they don’t shift as you are cutting both layers out.
Cut along your lines with fabric scissors. At the top where you have some "bumps", I try to eyeball it and cut a straight-ish line across to make it easier on myself later.

Take out the pins and fold the fabric pieces exactly in half and cut a *tiny* chunk out of the very middle to mark the center.
Do the same with both sides of your zipper.

With one of your fabric pieces right-side UP (this is the pretty side), lay your zipper right side UP (zipper pull up) on top and line up the marked centers. Use clips or pins to attach the pieces together.

Starting at the zipper stop, sew ¼ inch along the zipper and finish at the second zipper stop.

Flip the now-attached zipper over and either finger press or use an iron to press the fabric down away from the zipper. I like to sew another line just an 1/8 inch in on the fabric to secure it to the zipper and keep the fabric from getting caught in the zipper during use.
Time to work on the second side of the lining.

Lay the side with the zipper that you just finished right side UP and lay the second lining side right side DOWN and line up the top edge of the lining with the top unsewn edge of the zipper. Match up your center marks and clip or pin the pieces together.
Sew these two together with a 1/4 inch sew allowance just as you did with the first side.
Flip the now-attached zipper over and either finger press or use an iron to press the fabric down away from the zipper. Sew another line just an 1/8 inch in on the fabric to secure it to the zipper.

Now we need to close the bottom and sides of the lining. Match up both sides of the lining and pin or clip in place. Don't sew the zipper tabs at the end of the zipper itself.
Sew at 1/4 inch starting as close to the zipper as you can (but not the tabs) and continue down to the bottom, across the bottom itself, and back up the other side and stop before the zipper tabs.
Once you have it all sewn don't forget to test your zipper and make sure everything works properly. Leave it unzipped for the next step.

Insert your completed lining into the bag itself. Center it and starting on one of the long sides, line the zipper teeth up with the second row of edging on the bag itself (the colorful one if you followed the pattern) and clip or pin in place.
Now do the opposite side of the bag. Line the lining up with the second row of edging and clip or pin in place. Continue around the bag.

The lining ends will not reach the very end of the bag. Clip them in place about 1 to 1/2 inches from the crocheted ends of the bag.

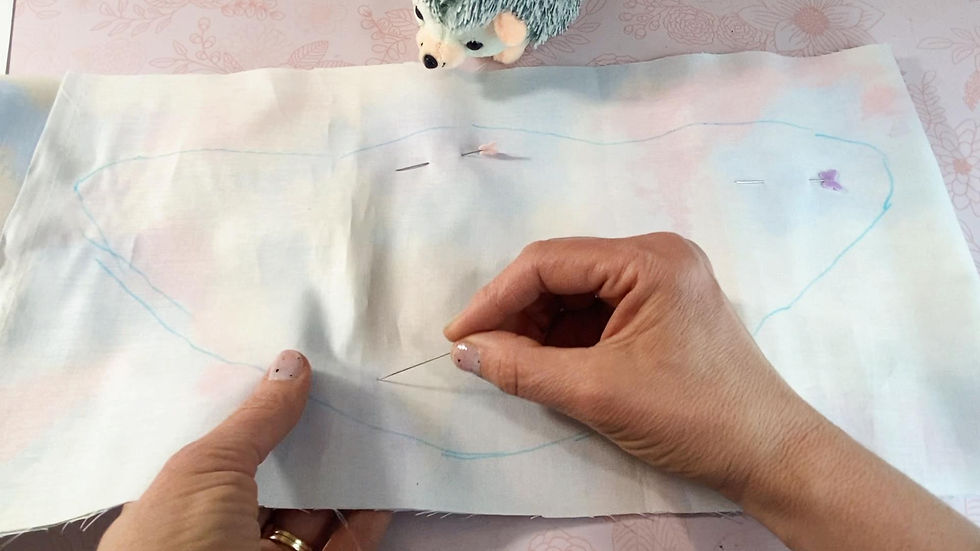
Once you have everything pinned or clipped in place, sew both sides of the zipper to the bag using the line of stitches just inside the lining as a guide (see the arrows in the above photo). Get as close to the ends as you can with your sewing machine but know that you will have a bit at each end that cannot be sewn. You will attach those next.
Now you will sew those ends together so they don't move around inside the crocheted bag.

Using a sharp needle and thread that matches the body of your bag, sew 3-4 stitches through the very ends of the lining, the zipper and the bag itself.
Insert the needle and thread through the crocheted outer piece, the zipper tab, both front and back of the lining, the second zipper tab and the other side of the crocheted portion.
Once you have gone back and forth through all the layers, knot the thread and repeat for other side.

Last, you need to close the end of the crocheted bag portion so the zipper and lining are completely enclosed.
Cut a 20-inch piece of yarn that matches the body of the bag and use a tapestry needle for this step.
Making sure the D ring is outside the bag, insert your needle and yarn right next to the D ring and under both loops on both sides of the bag.
Then move to the stitch to the left and back under both loops on both sides of the bag toward yourself. Knot the starting end and working yarn together. Continue stitching the two sides together until you reach the zipper stop. I like to reverse and go back through all the stitches until I reach my starting spot. Knot the two ends together and weave in your ends.
The bag portion is complete!
Making the adjustable strap:
Now to make the strap itself. For this part you will need the slide adjuster and both swivel snap hooks.
Cut your webbing. I cut mine at 54 inches and have lots of webbing to adjust but you could also go up to about 60 inches.

At this point I recommend using a lighter to quickly and lightly burn the cut edges of your webbing. This stops any future fraying. I know from the picture it looks like I was trying to light a bonfire, but you only need a very quick back and forth motion for just a second or two.

Flip the strap over so you are looking at the back side (if you have a back side) and feed the first raw end of your strap under the left side of the adjuster and up through the right side.

Loop the end of the webbing around and bring it back through on the left side of the adjuster.

Pull the end about an inch along the back side of the strap and stitch it in place with your sewing machine. I go back and forth across the end multiple times to make sure it is secure. Keep in mind though that you will be able to see this on the back of the strap so try to make it pretty.
Let’s work on the other raw end.

Still with the strap back side up, thread one of the snap hooks onto the second webbing end and continue pulling the snap hook along the back of the strap until it is out of the way.

With the back of the strap still facing up, hold the strap adjuster you attached to the first end so it is hanging down.

Thread the second raw end back through the adjuster going down on the right and back up and over the center bar on the left. You will pass over the end you have already sewn in place.
Continue pulling the second end until you have enough length to work with which for me was about the middle of the strap.

Feed that same second raw end through your remaining swivel snap hook until you have about an inch and fold it against the back side of the strap as you did with the first end.

Stitch the end to the back of the strap going over it multiple times as you did with the first end. Remember to keep it pretty though because you can see this stitching from the front AND the back.

Your strap is finished and ready to clip onto those D rings on the ends of your bag.
It’s so cuuuuute! I can’t wait to use mine and I know my daughter is going to love hers. Now I want to make them for everybody!
If you want to add a care card with your gift, you can find some cute ones in my Etsy shop.
Don't forget to subscribe so you don't miss any new patterns or projects!
Happy crafting!
Comments