Make Your Own Amigurumi Sticks with Disney Doorables for the Best Crochet Hack
- Nichole Jensen
- Dec 14, 2024
- 4 min read

If you have ever crocheted an amigurumi (a stuffed animal), you probably know the pain of sewing body parts together. You can have everything positioned just right and by the time you finish stitching things together one ear is higher than the other, one arm is closer to the stuffie’s back, and why the heck do the legs look uneven?
Someone somewhere came up with the brilliant idea to hold limbs and pieces in place with knitting needles while you sew, and once you try it, you will NEVER go back to sewing without them. Game changer for sure.
To use them all you have to do is position your stuffie arm or leg or whatever you are sewing on where you want it to go, insert the knitting needle through the arm and into the body, and you’re ready to start attaching. The needle will hold the arm and not do any damage to your cute stuffed toy.
Now, you can buy plain knitting needles, and they will do the trick. If you take nothing else from this tutorial, TRY THE KNITTING NEEDLES. But, if you want to add some extra fun to the process, with just a couple supplies you can add beads and even Disney characters to the top. Disney characters you say? Yep, you can add Disney Doorables in fact which are just the cutest little figures known to man. And the process is super simple and fast, I promise.
And once you've made some for yourself and tried them out, you're going to want to make them for every crocheter in your life. So, I have a free printable instruction card for you so when you gift them your recipient will know what to do with them.
Let's jump right in!
Watch the video tutorial:
Supplies to Make Amigurumi Sticks:
This post may contain affiliate links which means at no extra cost to you I may receive a commission if you decide to make a purchase through my links.
JB Weld SuperWeld Extreme Glue - This is the only glue I found that holds silicone in place.
Silicone beads – I bought a couple different types to mix and match and they were all between 12 mm - 15 mm in size.
Masking or blue painter’s tape
Non-stick craft mat or drop cloth to protect your working surface
Optional (but definitely highly recommend):
Steel hand drill - I used the 2.2 mm drill bit
Baby wipes
Let's Get Started Making Amigurumi Sticks:
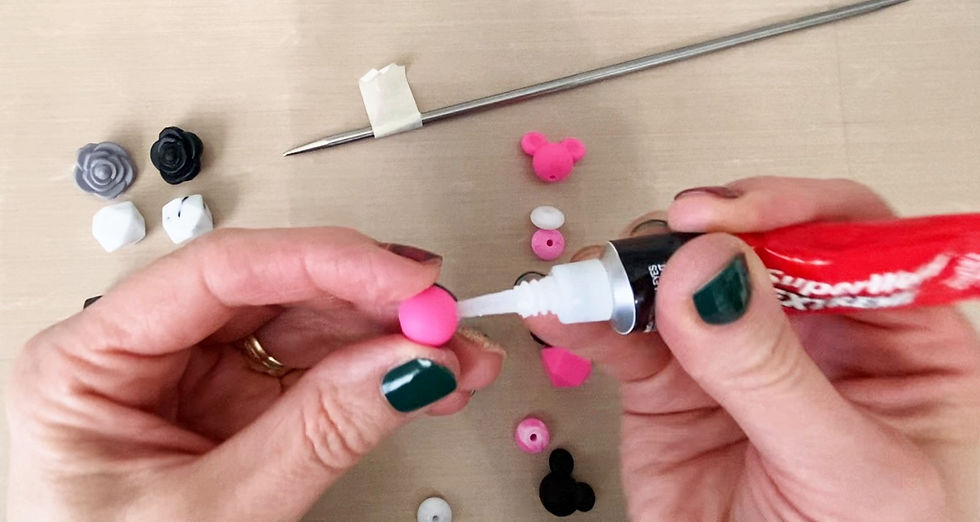
If you want to just use beads, all you need are the beads themselves, the knitting needles, and glue. Not just any glue will do though. The JB Weld SuperWeld Extreme glue is the only one I tested that would grip silicone.

Test out which beads you want to use and in what order. I put them on the knitting needle to really get the full effect. This way you can make sure you end up with the right amount of space to slide on all the beads you want (and cover the end of the needle),
I typically only add about three to four beads because I want to make sure there is enough working area on the needle to insert into the amigurumi.
Once they are on the needle, mark where the bottom of the first bead will go on the needle itself with a piece of masking tape or blue painter’s tape.

When you’re ready to make things permanent, add some glue to the inside of the bottom bead (make sure you do this in a well-ventilated room because the fumes from this glue are no joke). Insert the needle into the bead and push it down in place just above the tape. Repeat with the rest of the beads making sure the final bead covers the end of the knitting needle.
If you get glue anywhere you don’t want it, baby wipes are very helpful to clean it up before it dries.
All that’s left to do is wait! The glue instructions say the glue will cure in 24 hours.
I do put one larger bead on the other end of the needle to protect it but since you want this to be removeable, there is no glue involved.
Add a Disney Doorable to Your Amigurumi Stick:

If you want to add a Disney Doorable or other figure to the top, there’s only one extra step. After you add any other silicone beads you want to the needle, use a hand drill and a 2.2 mm bit to make the hole in the bottom of the Doorable larger and deeper.
Do this by holding the Doorable steady in your non-dominant hand, putting the drill bit into the hole, and then twisting the drill with your dominant hand while applying a bit of pressure.
You can apply some glue to the hole in the bottom and place the Doorable on the end of the knitting needle the same as you would a final silicone bead. I like to twist it on while pressing downward until the needle is inserted as far as it will go.
Wait for the glue to dry and you’re set!
These amigurumi sticks have been a game changer for me and now I enjoy crocheting stuffed animals even more. Plus, who doesn’t love a little Disney magic in pretty much everything?
Grab your free printable instruction cards here:

.png)


Comments